
Greenboog propagation field guide
The key question is not “Which hack is fastest?” It is “Does this piece contain living growth tissue, and can its current roots and leaves stay in balance while it establishes?”
Use the material you actually have, not the method with the most dramatic video.
| Material | Can it make a plant? | Best use | Main risk |
|---|---|---|---|
| Rooted basal offset | Yes, when it has its own growing point | Lowest-risk home method | Tearing the connection or losing too many roots |
| Firm cormel/storage organ | Potentially, if living and intact | Small propagules found during repotting | Rot from stagnant saturation or drying before roots form |
| Clump/rhizome division | Yes, when each section keeps viable growth tissue | Crowded mature plants | Oversized wounds and under-rooted sections |
| Detached leaf or petiole | No complete clone without basal growth tissue | Not a propagation method | Temporary survival mistaken for successful propagation |
| In-vitro plantlet | Already laboratory-propagated | Stage-IV acclimatization, not home cloning | Rapid water loss after leaving the vessel |
First identify the part you are separating
Alocasia are rhizomatous or tuberous perennials that commonly produce new growth from the base. Growers may call the small underground structures corms, cormels, tubers or bulbils, sometimes for the same-looking material. Those trade words are not used consistently enough to decide viability by label alone.
Instead, inspect the plant. A basal offset looks like a small independent crown beside the parent. A useful division includes a firm basal section with living growth tissue; roots and leaves improve its starting capacity. A small storage organ should be firm rather than hollow, mushy or foul-smelling. Do not cut repeatedly just to “find the top.” Preserve intact tissue and orient any visible bud or pointed growing end upward.
If identity is also uncertain, compare leaf shape, texture, veins, petioles and mature habit in the Alocasia types and identification hub before applying species-specific claims.
When is an Alocasia ready to divide?
Choose a stable plant with active or recently active growth, a firm base and enough roots to tolerate disturbance. A crowded pot or visible offset can justify division, but roots emerging from drainage holes do not automatically mean the plant is healthy. Inspect for sour substrate, collapsing petioles, pests and soft basal tissue first.
Delay propagation when the plant has just shipped, is chilled, severely dehydrated, actively rotting or has too little healthy tissue to share. Solving an urgent root problem may still require unpotting, but that is rescue work—not an ideal multiplication event. A larger, well-rooted division generally recovers faster than a tiny piece with one damaged root.
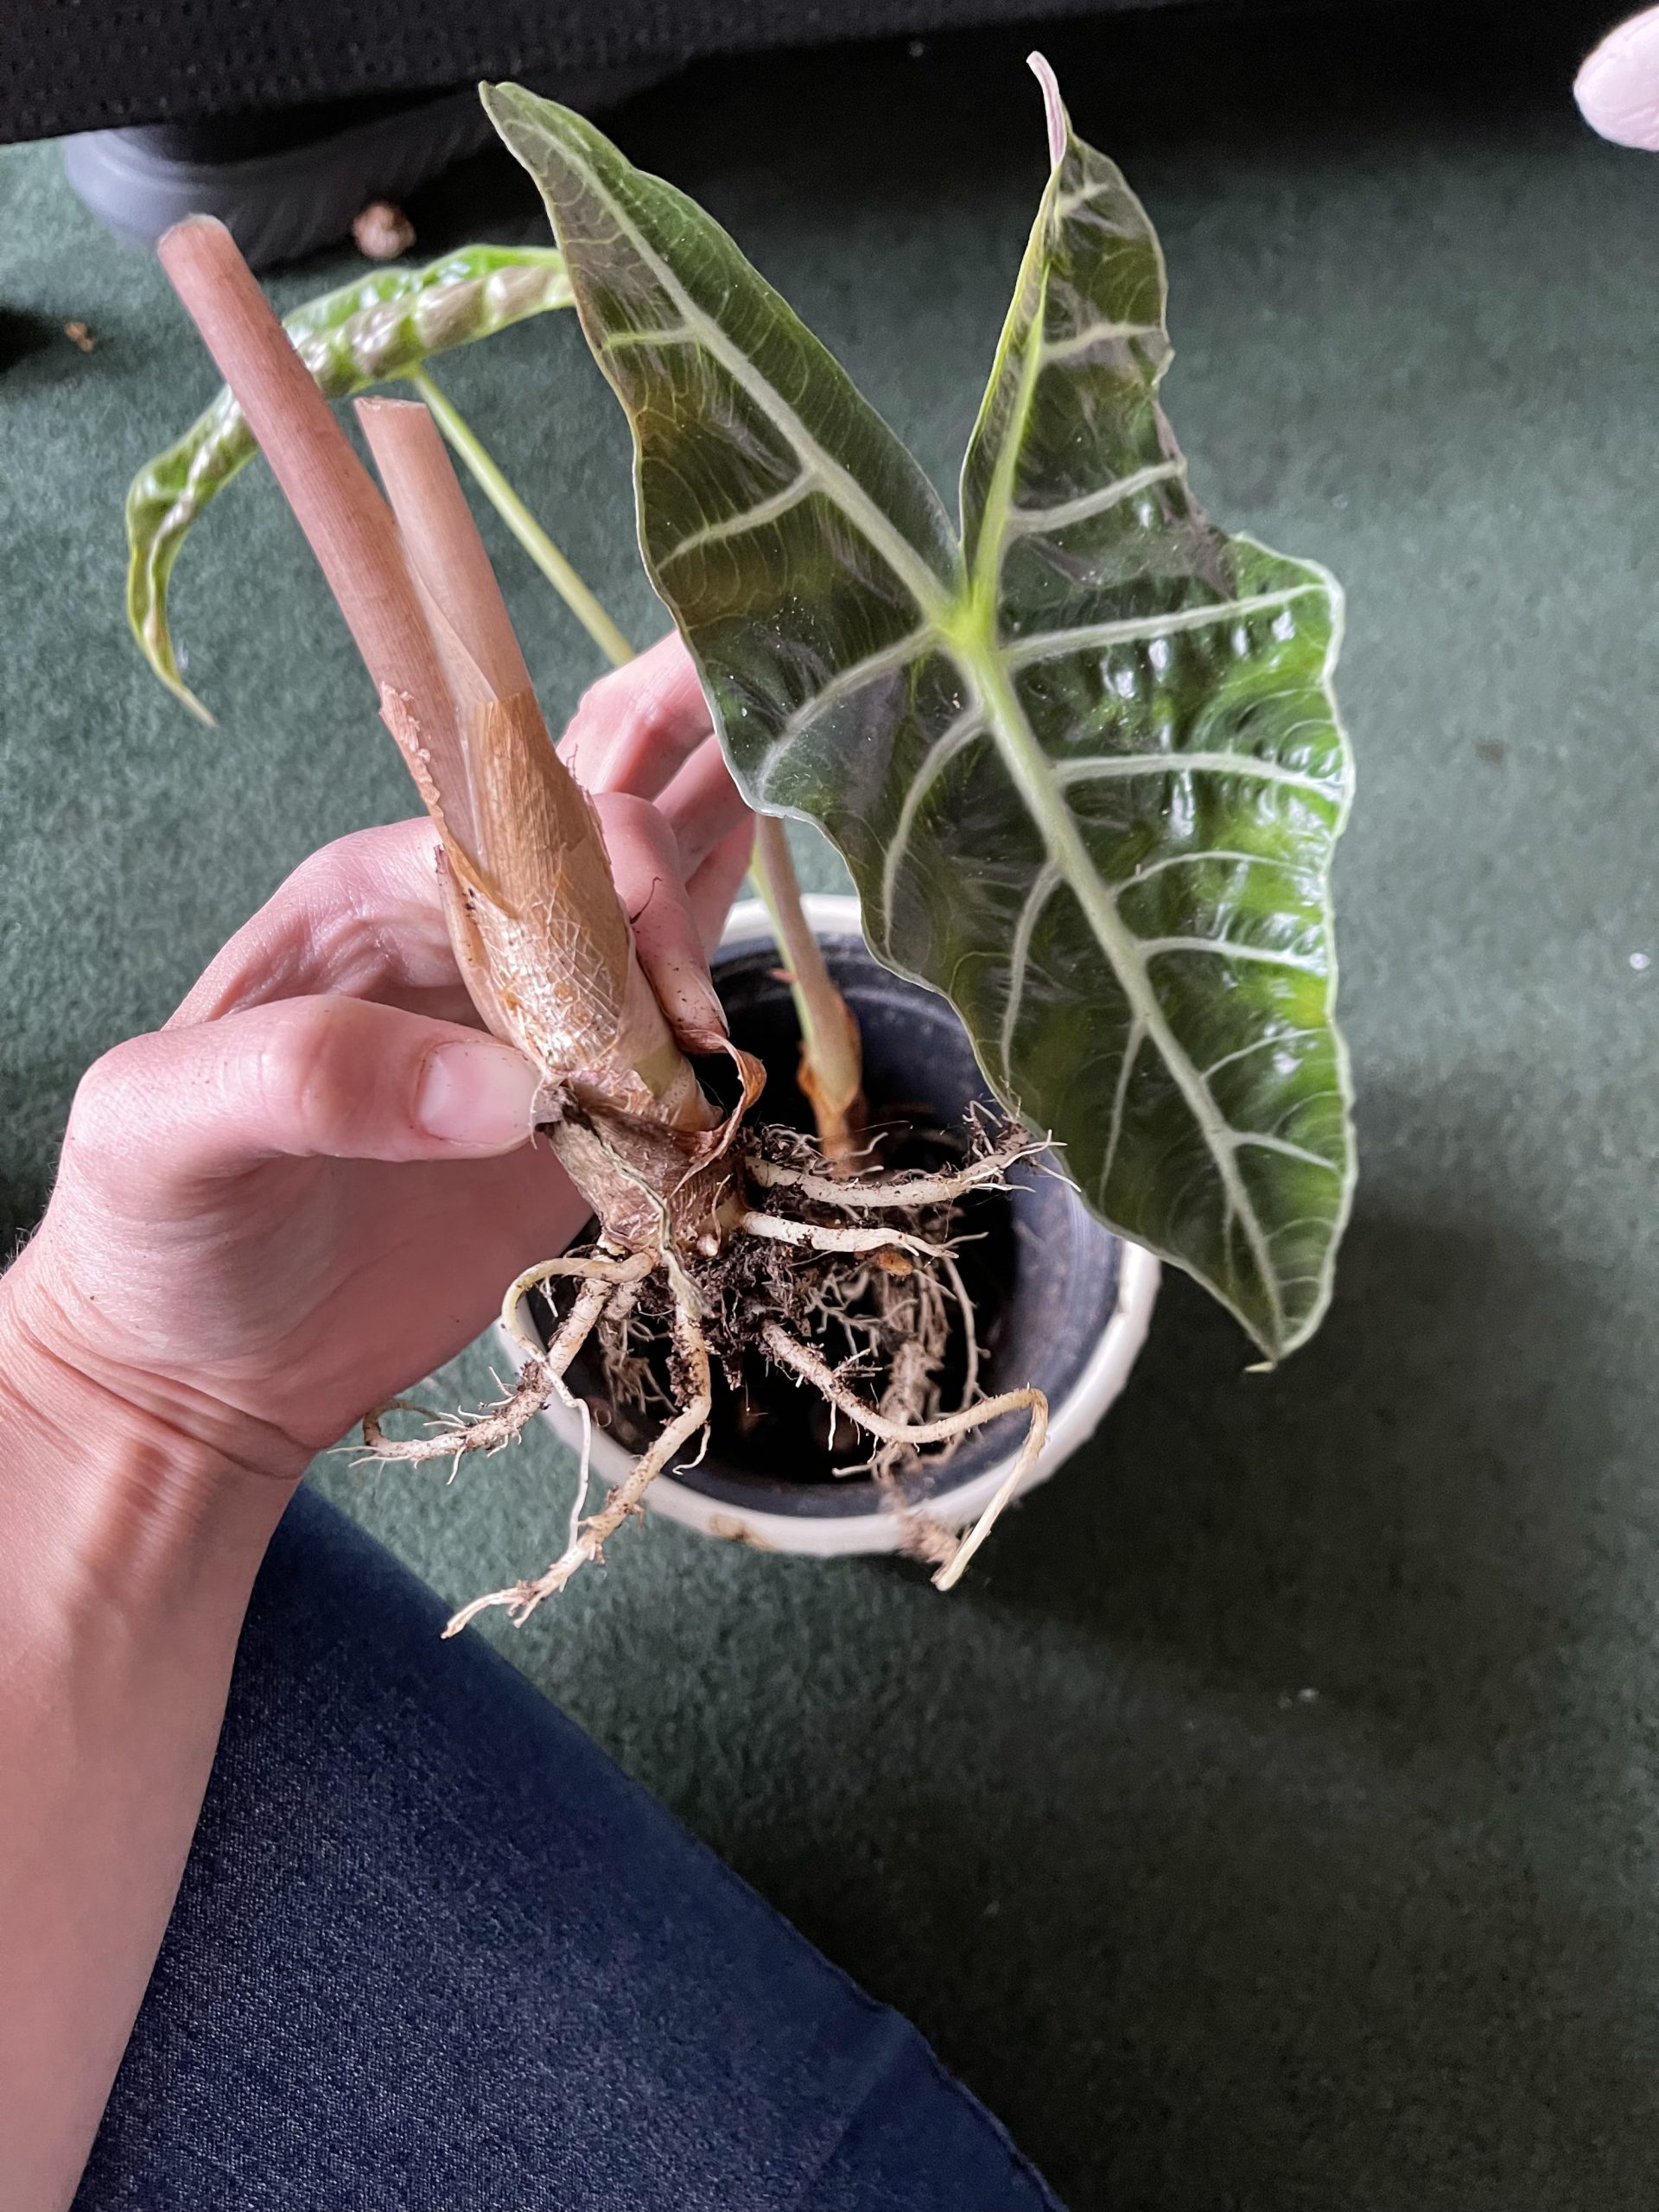
Method 1: separate a rooted basal offset
- Prepare before unpotting. Set out a clean container with drainage, fresh airy medium, clean gloves and a disinfected blade in case the connection cannot be teased apart.
- Remove the root ball gently. Support the petiole bases instead of pulling leaves. Loosen enough medium to see where the offset meets the parent.
- Confirm its own growth point. Look for a small crown or basal bud. Keep as many attached roots as possible.
- Separate at the natural junction. Ease roots apart by hand. If tissue must be cut, make one clean, controlled cut rather than sawing through the root ball.
- Pot to the root mass. Use a small container that does not surround a few roots with a large, slow-drying volume. Keep the crown at its previous level rather than burying petiole bases deeply.
- Settle, drain and stabilize. Moisten the medium evenly, let excess water leave and place the offset in bright filtered light while roots recover.
Iowa State Extension describes a valid division as a smaller whole plant with the needed vegetative parts and recommends an appropriately sized container, bright indirect light and a recovery period before feeding. Alocasia offsets do not need three to five leaves or rooting hormone to qualify; the decisive evidence is viable basal growth tissue and enough healthy root capacity for the remaining foliage.
Method 2: start a firm cormel or storage organ
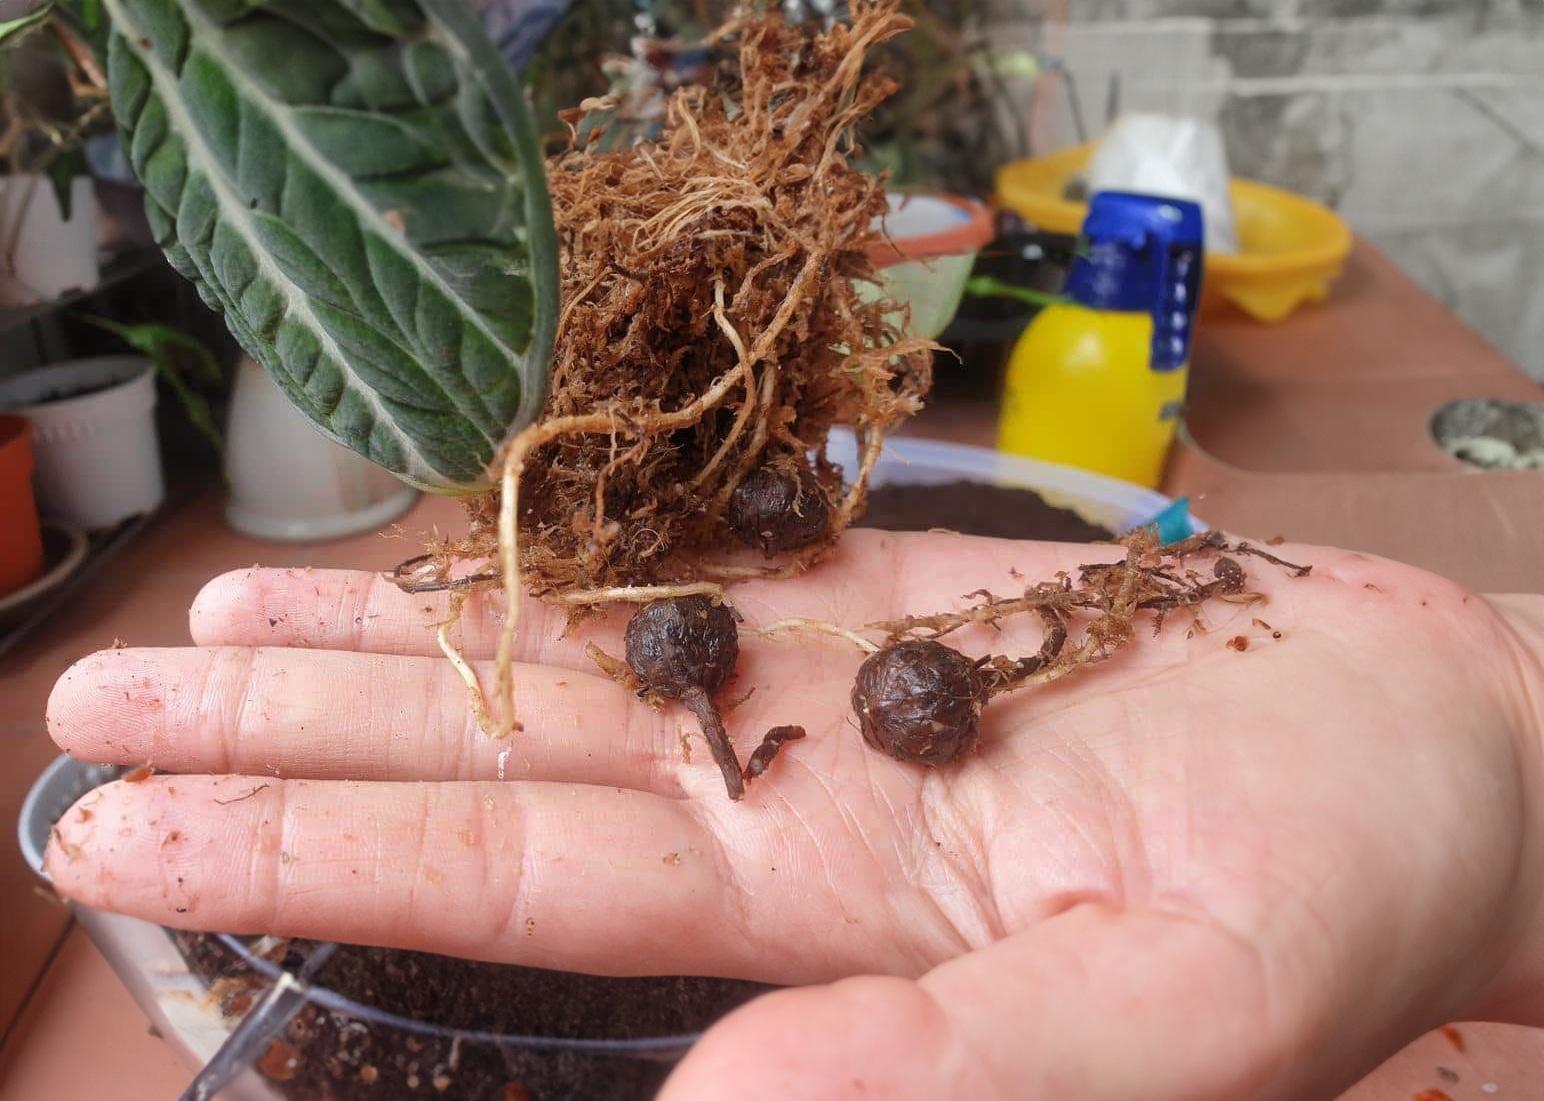
Small leafless propagules have little margin for error because they must produce roots and a shoot from stored reserves. Remove only material that separates cleanly; avoid scraping away every outer layer or cutting into firm tissue without a reason. Discard a piece that is completely soft, hollow, foul-smelling or collapsing.
- Clean by observation, not abrasion. Remove loose substrate and inspect. Do not peel aggressively to chase a pale surface.
- Choose a small clean vessel. Use a shallow amount of moist, airy propagation medium so you can monitor moisture without drowning the propagule.
- Orient cautiously. Place a visible bud or pointed growing end upward. If orientation is unclear, rest the structure on its side rather than burying it deeply.
- Keep moist, not waterlogged. The medium should supply moisture and oxygen. Standing water and a sealed stagnant container can turn a weak spot into rot.
- Protect from rapid drying. A clear cover can slow water loss, but include gas exchange and inspect regularly. Remove accumulated standing water and any decaying material.
- Transition after roots and a shoot appear. Increase ventilation gradually, then pot into a small container once the new plant can support itself.
Method 3: divide a mature clump or rhizome section
Division is useful when several crowns or basal shoots share a crowded root mass. The goal is not to turn every visible seam into a plant. Plan the fewest divisions that give each section a viable crown or growth point, firm basal tissue and enough roots to recover.
Remove old medium only as far as needed to see the structure. Pull apart natural divisions with your fingers; use a clean blade for a firm connection. Trim only confirmed dead or mushy tissue. Pot sections separately, matching each container to its root mass, and protect them from intense sun and repeated disturbance while wounds and roots stabilize.
Do not let a large leaf canopy dictate a large pot. If a division lost many roots, removing a badly damaged leaf may reduce demand, but stripping every leaf removes photosynthetic capacity. Balance the foliage with the roots you actually retained.
Why a leaf cutting is not enough
A detached Alocasia leaf may remain green in water for a time and can sometimes produce incidental roots from damaged basal tissue. That does not prove it contains the meristem needed to build a new crown. Without a viable basal growth point, it cannot reproduce the complete plant.
This is the practical boundary: propagate the crown, offset, rhizome section or viable storage organ—not a leaf blade and petiole alone. If a “leaf cutting” includes a chunk of basal stem with a bud, the basal growth tissue is doing the work; calling it a leaf method hides the part that matters.
Aftercare: balance water loss with root capacity
A fresh division may droop because disturbed roots cannot immediately replace water lost through the leaves. That same symptom can also occur in a saturated, oxygen-poor root zone. Check pot weight, medium depth, root condition and the speed of change before adding more water.
Use stable warmth, bright filtered light and moderate air movement. Protect freshly divided material from harsh direct sun, cold drafts and a sudden move into very dry air. Keep the medium evenly moist while roots re-establish, but allow drainage and oxygen. A humidity cover can help a tiny, under-rooted propagule; it should not become a sealed wet chamber that is never inspected.
Wait for root activity or new growth before feeding. Fresh potting medium may already contain nutrients, and damaged roots do not become healthier because fertilizer was added on a schedule. For a full cross-genus transition protocol, use the tissue-culture acclimation guide.
| Observed pattern | Check first | Safer next action |
|---|---|---|
| Droop + light dry pot | Root amount, leaf demand, rapid air drying | Moisten evenly; stabilize humidity and light without flooding |
| Droop + heavy wet pot | Drainage, cold, soft roots or basal tissue | Restore warmth and oxygen; remove only confirmed decay |
| Cormel becomes soft | Stagnant moisture, wound damage, no gas exchange | Isolate; keep only firm viable tissue and correct the environment |
| No growth but still firm | Warmth, moisture balance and intact growing point | Hold conditions stable; do not keep digging it up |
| First leaf yellows | New root/shoot activity and whole-plant trend | Observe before fertilizing; one juvenile leaf is not a diagnosis |
| Leaves curl | Root-zone moisture, heat/light, pests and airflow | Use the leaf-curl diagnostic |
Tissue culture is a different propagation stage
Home separation of an offset is not tissue culture. Commercial micropropagation begins with selected plant tissue in a controlled laboratory sequence of establishment, multiplication and rooting, followed by acclimatization. By the time a collector receives a rooted plantlet, the immediate job is transition—not repeating laboratory multiplication.
UF/IFAS explains Stage-IV acclimatization as the move from uniform in-vitro conditions to a normal growing environment, with water relations and reduced photosynthetic competence as major challenges. Reduce humidity gradually, begin in gentle light and change one major condition at a time as functional roots and leaves develop.
Tissue culture can multiply selected material efficiently, but “tissue culture” alone does not guarantee that every plantlet is permanently disease-free, genetically identical in every trait or stable in variegation. Confirm the actual stage, roots, vessel status, batch photos and seller terms. Browse the tissue-culture Alocasia category only for live commercial formats.
What propagation can—and cannot—preserve
Vegetative division aims to preserve the parent genotype, but the next leaf is still shaped by maturity, light, root health and pattern expression. A variegated offset with balanced green tissue may have more energy capacity than an almost-white propagule. Separating the palest piece does not force better future variegation, and removing every greener shoot can weaken the shared plant.
Keep exact labels tied to traceable mother material and real photos. If the goal is buying rather than propagating, use the Alocasia collection for current established formats; product pages, not this guide, own stock, size, price and shipping claims.
Safety around sap, tools and pets
Alocasia contains insoluble calcium oxalates and sap can irritate skin or eyes. Wear gloves, keep cut tissue and small cormels away from children and pets, clean tools after use and do not touch your face while dividing. The ASPCA lists Alocasia as toxic to cats and dogs. Contact a veterinarian or poison service if chewing causes oral pain, swelling, drooling, vomiting or trouble swallowing.
Alocasia propagation FAQ
Can I propagate Alocasia from one leaf in water?
Not from a detached leaf and petiole alone. A complete new plant needs viable basal growth tissue. If a piece sold as a leaf cutting includes part of the crown or a bud, that hidden basal material—not the leaf blade—is what can regenerate.
Should I let a cut Alocasia cormel dry for two days?
Do not apply one fixed callusing period to every propagule. A cleanly detached, intact storage organ may not need to be cut at all. If tissue was wounded, keep it clean and avoid immediate stagnant saturation, but do not desiccate a tiny propagule to satisfy a calendar.
Which way is up?
Place a visible bud, point or emerging shoot upward. If the structure has no clear orientation, rest it on its side near the surface rather than repeatedly cutting or burying it deeply.
Do I need rooting hormone?
A rooted offset already has roots, and a viable cormel contains its own stored reserves and growth tissue. Rooting hormone is not a requirement in the RHS offset method. Clean separation, viable material and moisture–oxygen balance matter more.
When can I fertilize?
Wait until the propagule is rooted and producing growth. A fixed eight-week rule ignores medium fertility, root condition, light and temperature. Start conservatively and follow the fertilizer label once the plant can use nutrients.
2 thoughts on “How to Propagate Alocasia: Offsets, Cormels & Division”